This is stage 2 of the Quick Start example for Machine Control Studio with the MCi module target.
In this stage a new project will be created using the New Project Template selector.
Once Machine Control Studio starts up, by default there will not be an active project, and the Start Page will be visible (as seen in Figure 1 below). The Start Page allows the user quick access to Recent Projects or other common Getting Started tasks, as well as displays the active version of the Machine Control Studio tool. Additionally, the Start Page displays a News section which can display a website of the users choosing (by default will display the introduction to Machine Control Studio page).
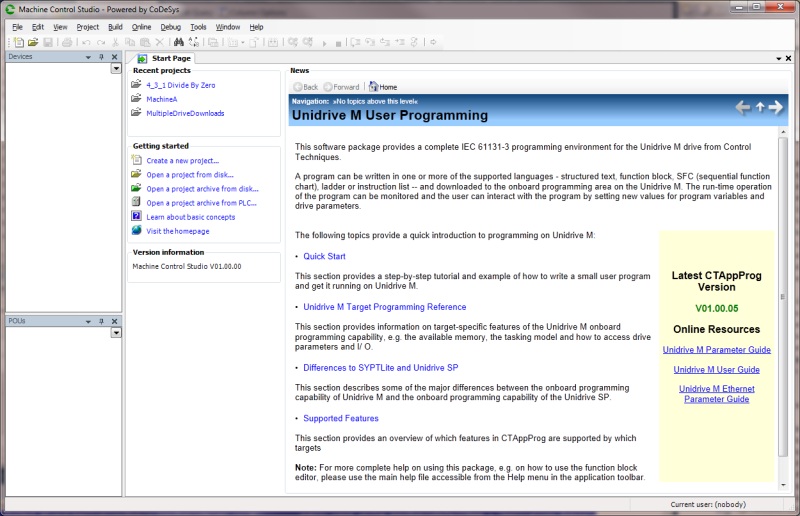
Figure 1 – Machine Control Studio Start Page
Create a new project by selecting File > New Project from the Machine Control Studio menu bar, or selecting the Create a new project link from the Getting Started section of the Start Page.
When creating a new project, the New Project template selector dialog will appear as seen in Figure 2 below. For this example, we will choose the MCi module Project template (see highlighted item in Figure 2). Name the project “GettingStartedExample” or another name as desired and choose the desired location to store the project. Spaces and special characters are allowed in project names. When complete, press the OK button to continue.
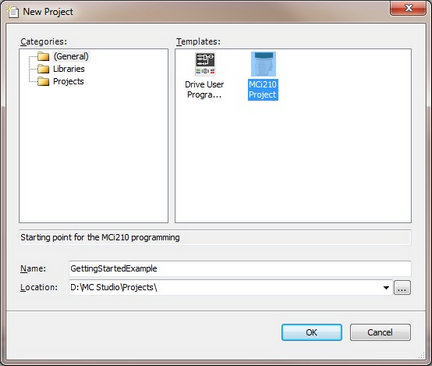
Figure 2 – New Project Template Selector Dialog
Use the MCi Module dialog to define the desired project settings. This dialog allows the user to define the name that the drive object will appear as in the project tree, as well as choose which Tasks/Programs will be created in the project. Finally, the desired language for the user programs can be selected here.
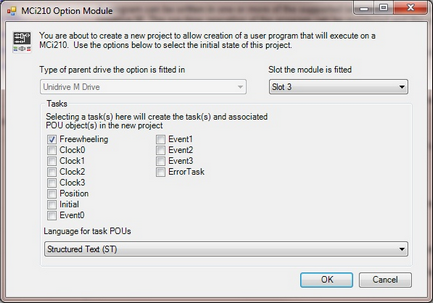
Figure 3 – Project Configuration Dialog
3a) Select the slot that the MCi Module is installed to.
3b) Activate the checkbox to create a Clock task within the project. Any 1 of the 4 clock tasks would be suitable.
3c) Choose Structured Text (ST) as the language for the Clock program. Note that the configuration dialog refers to programs as POU’s. More discussion of the POU will come later in this document. For now, you can use the terms POU and Program interchangeably.
Once complete, click OK to accept the settings entered in the previous steps. Machine Control Studio will then proceed to create a new project matching the information provided in the dialog in Step 3 above. Figure 4 below shows the result of the newly created project. Note that the Devices tab now contains tree listing of devices and objects.
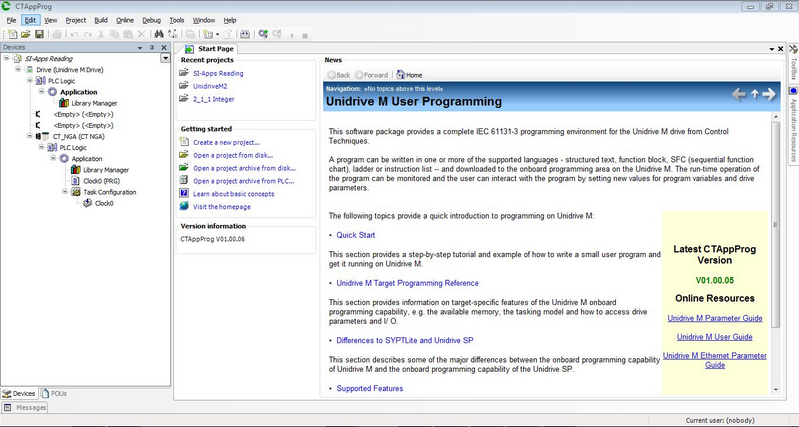
Figure 4 – Device List
Figure 5 below shows a closer look at the Devices tree and describes some of the components in more detail.
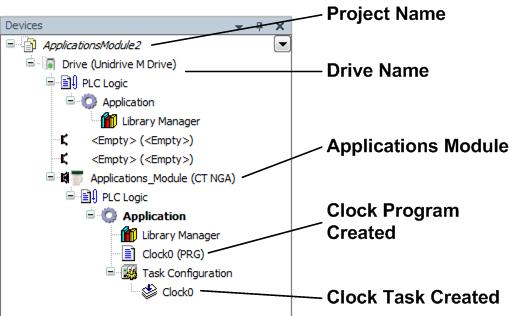
Figure 5 – Devices tab tree
Note how the settings defined in Step 3 caused a Task named Clock as well as a Program (also named Clock) to be created. Machine Control Studio has automatically assigned the Clock Program to run on the Task of the same name. Simply double-click on the Task item in the Devices Tree to display the Task Configuration view as seen in Figure 6 below.
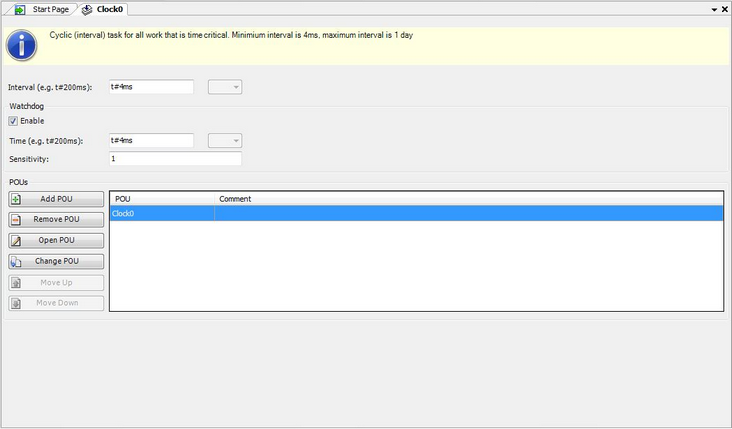
Figure 6 – Task Configuration View
The MCi module also contains a Watchdog. This can be set up in the POU tab underneath the Interval selection as shown above. See the section Watchdog in the main application help.
This Task configuration view allows the user to assign a Program to run on the chosen Task and to configure the desired Update Rate (or Interval) for that Task. By default the Clock Task is configured to have a 32ms interval (or update rate). The Clock task interval for the Applications Module target can be adjusted by the user in multiples of 4ms with a low limit of 4ms.
For more information on tasks in Unidrive M, see Tasking Model.
This is the end of stage 2 of the Quick Start example.
The next Quick Start stage is:
The previous Quick Start stage was: